Please Note: As an Amazon Associate and Google Adsense publisher, I earn from qualifying purchases

The Golden Rule of Perfect Espresso

By now you've probably studied my 9 steps to making perfect espresso coffee and the separate section on making perfect crema. In the section on making perfect crema, I made reference to "The Golden Rule" that you see frequently quoted, which is: "Extract 2 to 2.5 ounces of coffee into your cup in 20 to 30 seconds from the moment you turn on the pump."

I have a completely different Golden Rule for making perfect espresso coffee that I am going to share with you now.

Crema floating on top of an espresso 
New Zealand where I grew up has an even more deeply entrenched "espresso coffee culture" than the United States, and there is one significant difference in how espresso coffee is made in New Zealand cafes and coffee shops. That key difference is this: in the United States the espresso is typically brewed into a pitcher and then poured into the cup.

In New Zealand, and many other countries for that matter, the espresso is brewed directly into the cup from which is will be drunk. This one simple difference makes a huge difference in flavor. Why? The crema!

Crema is the caramelized coffee sugars and coffee proteins that float on top of a well-brewed espresso coffee, and carries with it immense aroma and flavor. If you've had espresso and not liked it, it may have been because the "barista" didn't do a good job of making the espresso and literally threw most of the crema down the drain! How so? Quite easily; by using the technique popular in the U.S. of brewing the espresso into a pitcher and then pouring it into the cup, most of the crema is left clinging to the sides of the pitcher, to be washed down the drain. What a crying shame! But it happens millions of times all over the U.S. every day in every Starbucks, and other coffee chains you frequent. Why do they do it?

Espresso crema - the liqueur of coffee.Crema consists of caramelized coffee sugars and coffee proteins. It will be formed only when you brew your coffee at the right pressure and right temperature. Read here about how to make perfect crema.

Crema! in
Stylish Glass Espresso Cup with Stainless Steel Handle
Here's an illustration of what I mean. I brewed an espresso into a glass demitasse cup so you can clearly see the caramel-like foam on the top called "crema". Sometimes it may even appear milky-white when looking down on it, hence the name "crema".

Then I poured the espresso out into another cup. Look at all the crema left behind on the sides of the demitasse cup! The same thing happens when the coffee is extracted into a stainless steel pitcher and then poured into a cup.

Why do American coffee shops wash cream down the drain?

So that's my Golden Rule: Make your espresso directly into the cup from which you are going to drink it! Don't be guilty of washing your crema down the drain. You'll be amazed at the difference in flavor!


How to Make Perfect Espresso Crema

Crema is the essence of good espresso coffee. I like to think of it as the Holy Grail of espresso coffee. Without it you might as well pour it down the drain, and in fact at the cafe where I was trained as a barista, MacFarlane's Caffe in Inglewood, New Zealand, that's exactly what we had to do; no crema or bad crema and we had to start again. Down the drain it went. The test was to drag a teaspoon through the crema and if it didn't close up again and completely cover the surface of the coffee, then it was not good enough. So don't forget: espresso coffee without good crema is not good espresso.

Espresso shot with crema floating on top
Stylish Glass Espresso Cup with Stainless Steel Handle
There are several elements to "extracting" espresso coffee and achieving rich, creamy crema.

The beans

Some beans will never produce crema, even some that are sold as espresso roast. The best espresso roasts use primarily Arabica beans, which originated in Ethiopia, but have spread throughout the coffee-growing world. Some Robusta beans are typically included in the blend because of their ability to generate crema. Most people imagine espresso roast beans to be dark, but it all depends on the roast. You can get both light and dark espresso roasts. The beans in an espresso light or mid-roast tend to be quite dry and shrunken when compared to dark roasts which are plump and oily. If you are buying your beans from a good source, they should be able to d e for you the crema-producing qualities of the beans. (My recommendation: Coffee Masters Ethiopian Yirgacheffe)

The grind

It seems everything has to be just so when making espresso and producing good crema. The next thing is the grind. Basically you are aiming at not allowing the water to pass through too quickly, but not making the grind so fine that your machine won't be able to force the water through without straining. This is achieved in two ways: the fineness of the grind of the beans, and the tamping of the beans in the portafilter. To achieve good crema, for a double shot, extract 2 to 2.5 ounces of coffee into your cup in 20 to 30 seconds from the moment you turn on the pump. You will see this referred to in various places as "The Golden Rule". (I have a completely different Golden Rule for perfect espresso you should read about.) A single shot should still take 20 to 30 seconds, but now you will want 1 to 1.5 ounces of coffee in your cup.

The flow of the coffee when being extracted should be steady and even, coming from both holes of the portafilter. If your coffee beans are ground too coarsely, the flow will be too fast and no crema will be produced.

On the other hand, if they are ground too finely, the flow will be too slow, or hardly any flow at all and your pump will be straining. To a certain extent, you can make up for the grind being too coarse by tamping the coffee harder, or if the grind is too fine, by tamping more gently. With a bit of trial and error, adjust your grinder setting until you achieve the correct flow and perfect crema production. You need to use a conical burr grinder that grinds the beans to an even consistency and which has multiple variable grind setting. Here is my recommendation for a conical burr grinder (Breville Smart Grinder).

Tamping

Tamping is the process of pressing down on the ground coffee in the portafilter with a tool known as a tamper. The tamper should fit snuggly into the filter basket. Tamp with even pressure of about 30 lbs. How do you know what 30lbs is? Get out your scales and put them on the counter and practice so that you get the feel for how hard you need to press down. Tamping is aimed at achieving an even and consistent flow of the water through the coffee. If the coffee is packed unevenly, the water will find its way through gaps in the coffee, flowing too quickly through them for there to be a good extraction; most of the water will flow through the more loosely packed coffee, and not flowing through some of the coffee in the filter basket at all. In fact it is possible to bang out the coffee after the extraction is finished and see whole areas of coffee that are completely dry. You can't make good crema without tamping your coffee before the extraction.

Correct brewing temperature

The temperature of the water has to be hot enough to caramelize the sugars in the coffee to make the crema. The optimal temperature range is around 92 to 96 degrees Celsius (198 - 205 Fahrenheit). The best machines use a metal for the boiler that has good heat retention, such as brass. Also, many machines offer separate boilers for coffee brewing and steam generation. This is because the water used for steaming has to be heated to a higher temperature than is the optimal temperature range for brewing the coffee.

Correct brewing pressure

Effective brewing requires pressure of at least 130 psi, which some domestic machines just don't seem capable of. The pressure rating for your machine will be quoted in "bars". Many of the cheaper domestic machines achieve 8 bars of pressure, which is a stretch when it comes to achieving good crema. Get a machine that is rated about twice that. Sometimes these machines are described as "semi-commercial", but don't you believe it; consider this the minimum standard for your home espresso machine. (My recommendation: Breville BES900XL Dual Boiler Semi Automatic Espresso Machine or the Gaggia Evolution. See my reviews).

At the beginning, you will have to accept a certain amount of trial and error. Practice, practice, and practice some more. Vary everything: the grind, the amount of tamping pressure you use, and your beans.

With just a little bit of practice, provided you are using good fresh beans, you too will be pulling the perfect espresso shot with a rich layer of crema floating on top. Yum!

How to Make Milk for Espresso Coffee Drinks

Typically the milk is prepared in a stainless-steel pitcher or "jug" as it is called in some countries. You need the pitcher to be large enough to accommodate the expansion in the volume of the milk as you steam it. Choose the size of the pitcher based on how many drinks you are going to prepare. If you are going to prepare several drinks, you might consider preparing more than one batch of milk, or at least "recharging" what is left by adding more milk to the pitcher and preparing more. The fact is that once you have poured off milk for the first two drinks, you will be left with milk that is not sufficiently volumized to make a good drink and pleasing your guests.

In steaming the milk you are setting out to "volumize" it by adding tiny air bubbles to the milk, what are called "microbubbles". (Another expression you'll hear that means the same thing is "stretching" the milk). Place the tip of the steamer of your espresso machine just a little below the surface of the milk. Your aim is to suck air into the milk by forming a whirlpool near the top of the milk. Do not have the tip of the steamer above the milk or so close to the surface of the milk that the steam is blowing air into the milk: you are wanting the air to be sucked into the milk.

Do not move the pitcher up and down in an action that takes the steamer head in and out of the milk. Unfortunately, this is something that you'll see happening at quite a few coffee shops, and when you see it you can be sure the "barista" is poorly trained and you are about to be served an inferior drink.

Tilt the pitcher slightly so that the air being sucked into the milk is hitting the side of the pitcher near the bottom and is making the milk rotate so that the heat is being distributed and all of the milk is being brought into contact with the steam as it circulates around the pitcher.

By the time the milk has come to the correct temperature for your drink, it should be volumized to the extent that it has approximately doubled in volume. As I said before, make sure you leave sufficient room for this expansion to occur when you start out otherwise you will have to stop the steaming process before it is at the right temperature.

The milk should have been volumized by the addition of tiny "micro-bubbles" of air. It shouldn't be full of large bubbles which is what will happen if you lift the steam tip above the surface of the milk and blow into the milk. If however there are a few larger bubbles on the top of the milk when you are done, you can remove them by banging the pitcher on your counter top to break them

That's the basic preparation of your milk. However if you are going to be making a "flat white" or macchiato you have one more step to follow. That is to fold the micro-bubbles from the top into the milk at the bottom using a spoon or by swirling the milk in the pitcher until it becomes one consistent velvety and rich mixture. Use this milk for the preparation of flat whites and macchiato coffee. But here's what I do to save all the messy clean up when steaming your espresso milk: I use an Aerolatte whisk. Using the steamer in your home espresso machine can be a bit of a hassle. For a start, you need to have a machine that has a separate boiler for the water used to steam the milk. The reason for this is that to make steam, the water has to be heated a lot hotter than the water that is used to brew your espresso. If your machine has only one boiler for both brewing the espresso and steaming the milk, then don't use the machines steamer. (I give you an alternative below.) Some machines I found also cause the pressure in the espresso side to increase to the point that you get "blow back" when you remove the filter cup from the machine and coffee grounds will be blown all over your kitchen. (This was a fault of the "Briel" espresso machine I owned for a while; other than that fault, it was a good machine though. When using the steamer you also need to be meticulous in keeping the steam head clean of milk so that the the tiny hole that the steam comes through doesn't become blocked with dried milk, not to mention obvious health and hygiene reasons that demand you keep the steam head clean, milk being such a wonderful breeding medium for bacteria

For all these "drawbacks", until I bought my current machine which has a double-boiler with separate steamer boiler, I personally dispensed with using the steamer at home, and used a wonderful little gadget called an "Aerolatte", which is basically a battery-powered whisk. I used a mug in which to heat the milk in the microwave oven; 1 minute is the perfect time for bringing the milk to the right temperature in my case. You then use the Aerolatte to achieve the same volumization effect talked about above. Again, position the whisk head sufficiently below the surface of the milk for it to cause a vortex that sucks air down into the milk. I works perfectly, and all it takes to keep the whisk clean is to run it briefly under some running water after each time you use it

You can buy an Aerolatte at Amazon.com. You can get them in several finishes. The one I have at home is the matt black. I recommend getting the stand that goes with it too so you can keep it conveniently next to your espresso machine.

See my video of how to make milk for espresso with an Aerolatte whisk.

How to Make a Flat White

What is a "Flat White"?


flat white coffee
Flat White Coffee in Tulip Cup
More photos of flat-whites
Flat White is an espresso-based drink that originated in Australia and was perfected in New Zealand, and is currently spreading around the world at the hands of ex-patriot Kiwis and Aussies.

There are several things about the "flat white" that would surprise an American used to Starbucks coffee.

First is the rich and velvety texture of the flat white, making for an exceptionally pleasing drink in the mouth.

The second surprise is the size of the drink, typically served in a 165 ml tulip-shaped cup, which is a mere 5 1/2 ounces! But quality matters over quantity, and this king of espresso-based drinks is not to be drowned in milk, but rather supported by the milk.

In helping you to understand what a flat white is, let's compare them to a couple of other espresso-based drinks that I'm sure you are aware of: the cappuccino and the caffe latte.

Let's say the cappuccino is the "Marge Simpson" of espresso-based drinks, with the milk whipped into a bubbly froth and placed on top of the espresso like a high Marge Simpson "bee-hive" do.

The latte, on the other hand, has had a hair cut, but nonetheless, has enough froth left in the milk to top the drink off with a slight bit of teasing on top.

The flat white, on the other hand, doesn't have any of that volume on top, but rather has all that tease distributed throughout the espresso, giving it a rich, velvety feel texture, where the coffee dominates.

How to make a flat white at home

Let's start out with the "ingredients" list. No substitutions allowed, otherwise it's not a flat white!

  • fresh whole medium to light-roast coffee beans (throw away those beliefs that espresso is made with dark-roasted beans). If you are buying your beans from a West Coast U.S. roaster, they will often refer to light and medium roasts as "mid city" and "full city" roasts. Grind the beans to a fine espresso grind at the time of making your flat white.
  • a heated 165 ml / 5.5 oz ceramic cup. "Tulip-shaped" is the standard, but if you haven't got any that shape, just make sure it's not a large cup, or restrict how much milk you add to the espresso if it is larger.
  • a double shot of espresso with a good layer of crema floating on top (ristretto - i.e. a short extraction; because of the high ratio of coffee to milk, you need to avoid any of the bitterness that results from a longer extraction)
  • whole milk that has been "stretched", not foamed (never use reduced fat milk for a flat white - forget those urges to diet; one flat white a day is not going to make you fat)
Let's take it for granted that you've read all I've written here about making your espresso pull, rich with crema on top. So on to the milk.

The milk for a flat white should not have any of the dry foam on top of it that is typical for making a caffe latte or cappuccino. The term used for what you do to the milk is "stretching". This is achieved by keeping the tip of the steaming wand slightly lower into the milk than usual so as not to break the surface of the milk at all. Your aim is not to introduce air into the milk. The heating of the milk and circulation of the milk in the pitcher will result in the milk becoming stretched. The volume should more than double in size and the milk should appear somewhat glassy and shiny when done. The milk should be heated to approximately 60° C / 140° F.

If you have a domestic machine that doesn't have a double-boiler, then an acceptable alternative is to use an aerolatte whisk, once again taking care not to break the surface of the milk, and if necessary folding the milk at the end. You can read all about this technique here: how to foam milk for your espresso-based drinks.

If you have succeeded in making good stretched milk, there will be no dry foam on top. Pull your espresso shot in the later stages of your milk preparation or immediately after. Just before pouring hte milk into the espresso, bang the bottom of the pitcher onto a cloth on your counter top to break any air bubbles in the milk, and swirl the pitcher a couple of times. Finally gently pour the milk into the espresso so that the crema from the espresso floats on top of the milk. Voila! All going well you have made your first delicious flat white.

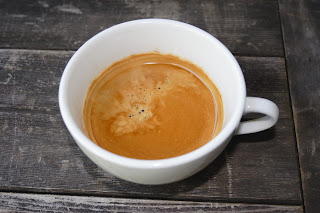
Flat-White lends itself well to making what is referred to as Latte Art. I don't profess to be an expert at latte art, however, with a bit of practice you might be able to create patterns such as leaves and hearts as you will see on any flat white made in Australia or New Zealand, and in the better independent coffee shops in the U.S. But first of all just perfect making a great flat-white; it tastes just as good when well-made without any fancy art on top. Even without any latte art, the caramel-colored espresso crema floating on top of the drink is a work of art in itself!

Now that I've wetted your appetite for a flat white, why not try making one at home. To get going you will initially need to make an investment in some appliances, so here are my recommendation for a home espresso maker and a coffee grinder.

Featured Post

How to Make Perfect Espresso Crema

Crema is the essence of good espresso coffee. I like to think of it as the Holy Grail of espresso coffee. Without it you might as well pour ...

Popular Posts